Home » Painter
Category Archives: Painter
Knowing Which Drywall Repairs Projects Should Be Done By A Pro
Does Your Drywall Need Repair? And What Can A House Painter Do About It?
When you pause to examine your drywall with a fresh perspective, you may begin to notice it the way a visitor would. Cracks, holes, scrapes, roughness, uneven surfaces, peeling tape, dented corners… they may seem like small details, but taken together, they can have a huge impact on the overall look and feel of your house.
To help you get a feel for what to look for, we have provided a description of several common drywall problems. However, it’s not very helpful to point out problems without giving helpful solutions, so we have provided those as well!
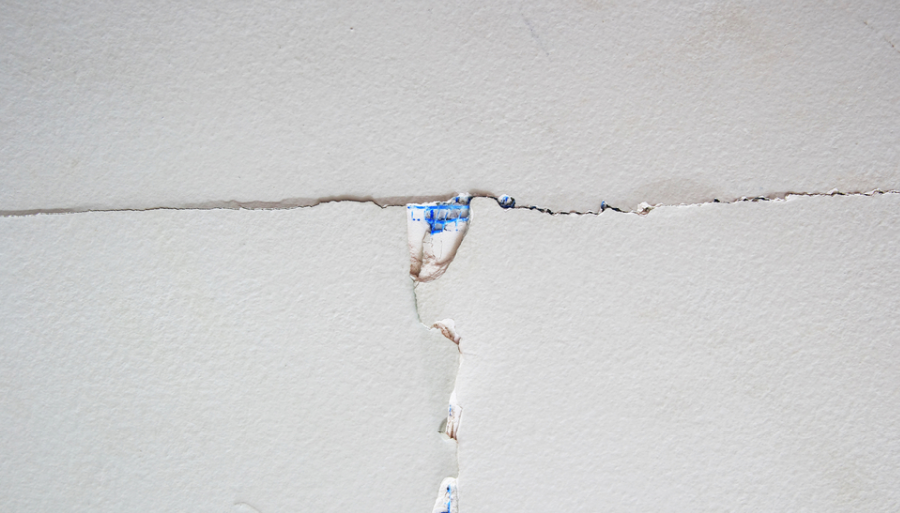
DRYWALL CRACKS
The Problem: Long, tiny cracks appear on the ceiling or walls, gradually growing longer (and possibly wider) over time.
The Cause: The drywall is fastened to wooden studs, which expand and contract with temperature and humidity. They can also bend over time. Since the drywall is not flexible, it will crack as this happens.
MECHANICAL DAMAGE
The Problem: Holes, dents, gouges, scrapes, indents and abrasions mar the surface of the drywall.
The Cause: Life, kids, pets, moving furniture, and a host of possible “oops” moments!
The Solution: Smaller drywall imperfections can be filled with drywall compound or spackle. Bigger holes need to be filled using a patch kit or a custom-cut piece of drywall to fill the hole. For best results, have a professional do the bigger patching jobs, since it is very difficult to achieve a clean, smooth repair.
UNEVEN SURFACES
The Problem: Random areas of bumpy texture on the walls, or other flaws that mar the smoothness of the surface.
The Cause: Poor installation of the drywall or a poor previous paint job. This could be caused by someone painting a wall while it was dirty, or using an old or dirty paint roller cover. Maybe a previous owner did some DIY drywall repair that didn’t produce a smooth, attractive result, and now the problem lies under a layer (or more) of paint.
The Solution: Sometimes the irregularities on a surface can be removed by careful sanding and filling to create a smooth surface. However, in some cases, the best way forward is skimcoating. This process involves troweling on a thin layer of drywall compound on a whole wall, creating a brand-new surface that is clean, clear, smooth, and beautiful!
PEELING DRYWALL TAPE
The Problem: The tape that covers the seams between sheets of drywall is coming loose, leaving visible cracks, and maybe even peeling right off the wall.
The Cause: Poor installation can cause this to happen, or water leakage, or extreme shifting/settling of the home.
The Solution: Use a razor knife to cut out the section of loose tape, sand the area smooth, and apply a new piece of drywall tape to the affected area with drywall compound. Prime the area and paint the wall or ceiling.
NAIL POPS
The Problem: Small bulges appear in the drywall, often forming cracks around them. In extreme cases, a nail head pushes right through the surface of the drywall.
The Cause: Seasonal shifting causes drywall movement, as mentioned above, and this in turn can cause nails to work their way back out of the wood, bulging through the drywall.
The Solution: Use a drywall screw to tighten the drywall back against the wooden studs, an inch or two below or above the popped nail. Then pull out the nail, or pound it firmly back in until it is below the level of the drywall. Now use drywall patching compound to fill the holes. Sand the compound smooth, prime, and paint.
Cut out wall cracks
When homes settle, drywall cracks sometimes shoot out above or below windows and above doors. You can’t just cover or fill the cracks with joint compound—they’ll come back. Instead, fix the cracks with joint compound and mesh tape. Mesh tape gives you less buildup than paper tape and is plenty strong. Protect the window or door trim with masking tape before starting the fix.
Fill holes three times
Fill small holes and indents (less than 1/8 in.) with spackling compound. For larger holes, use joint compound instead. Apply either compound with a putty knife, spreading it thin on the wall. You’ll apply two more coats (the compounds shrink as they dry), so don’t worry if the hole isn’t filled perfectly the first time. Let each coat of compound dry (read the directions; some dry in just two hours). Don’t believe spackling labels that say you don’t have to sand—you do. You’ll have to sand between coats if there’s any excess compound. After the final coat, use fine-grit sandpaper.

Water damage
In case of extensive water damage, the best solution is to replace the entire dry wall sheet. If the structure of the wall hasn’t been compromised, you can look into dry wall repair techniques. Before attempting to repair dry wall, finding and fixing the source of the damage is important to prevent problem recurrence. Once the necessary repairs have been made, allow the dry wall to dry completely and assess its condition. If there are any water stains, use a good-quality stain blocker to prevent stains from bleeding through the finish paint. To repair superficially damaged dry wall, scrape off the loose layers of paint and topping compound, treat the areas affected by mold with anti-mold solution and let the wall dry properly. Then, apply a quality filler over the repair area, let it dry completely and sand down any bumps with fine-grit sandpaper. If the water-damaged area is soft and spongy, it will most likely need to be replaced.
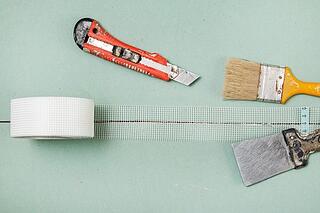
How to Repair Drywall Cracks
As a home or building settles, imperfections may develop in the drywall. With this easy guide, learn the latest techniques to repair drywall cracks. The only materials you will need to repair drywall cracks and even small holes are drywall (joint) compound, mesh tape, a putty knife, sandpaper and a sharp utility knife (drywall screws are optional).
To repair drywall cracks, without hiring a local drywall contractor, follow these fast, simple steps: follow these fast, simple steps:
Step 1
Use the utility knife to remove any loose drywall material.
Step 2
Carefully create a small indentation so that once applied, the mesh tape will be flush with the surrounding drywall. To do this, cut a narrow groove on either side of the crack with a sharp utility knife.
Step 3
A crack generally occurs because the drywall is moving and may need additional support. To be sure your drywall crack repair is permanent, secure the drywall. Insert drywall screws on both sides of the crack and along the entire crack. Be sure to screw into the wood behind the drywall. Countersink the head slightly but do not break through the paper layer.
Step 4
Using mesh tape designed for drywall repair, cover the crack and heads of the screws. Note: Some experts recommend hot mud (also called “quick set” or “fast set” joint compound) instead of drywall compound when using mesh tape. The powder is mixed with water and dries very quickly — 5-90 minutes, depending on the product. It actually dries too fast for the liking of some do-it-yourselfers, who prefer ready-mixed joint compound to repair drywall cracks and holes.
Step 5
Apply a thin layer of drywall compound and allow it to dry. Repeat until the drywall compound is slightly more raised than the wall. Once the drywall compound is dry, sand the area to make it flush with the existing wall. Brush away any dust or residue.
Step 6
Coat with primer. After the primer has dried, apply paint to match the existing wall color.
Drywall tape may occasionally loosen due to the passage of time, roof leaks roof or excess moisture in the building. Repair loose tape over joints in the same manner that you repair drywall cracks. The only difference is that any loose tape needs to be carefully cut away with a sharp utility knife.
Popped Nails In Combination With Other Issues Signal A Bigger Problem.
Normal house settling can cause framing lumber to move a bit, resulting in popped nails. If the house continues to settle, over time, additional nail pops could appear. Foundation problems can also cause movement that leads to nail pops, but in both cases, they will be accompanied by additional problems, including:
- Doors that stick or won’t shut properly.
- Cracks in the drywall around windows and doors.
- Cracks in the corners of the ceiling.
- Visible cracks in the foundation.
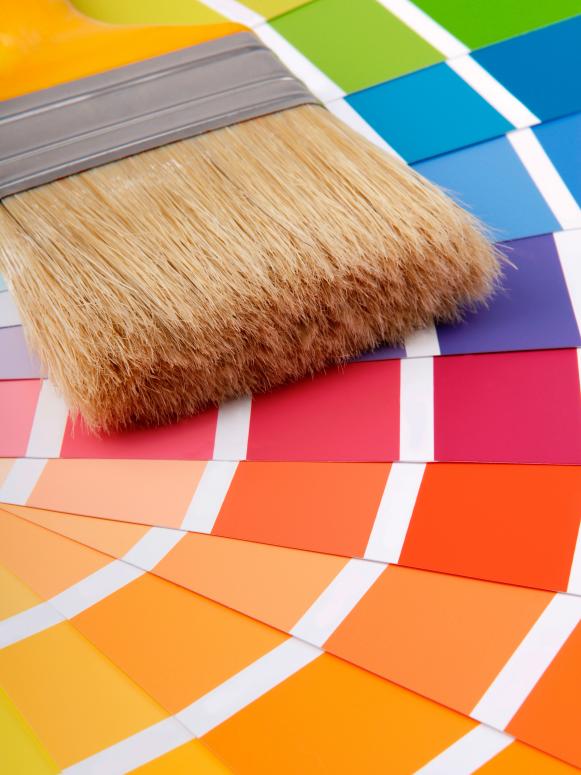
Attractive Interior Painting Can Give Surfaces A More Distinguished Look Than The Usual Painting
Tips for Choosing Interior Paint Colors
The easiest way to choose the best interior paint colors is to start with the colors you love. When you start with the colors you love, you are not bound by the traditional color schemes for a particular decorating style. Using your favorite color as your base color, you can use it to create a color scheme around it. Your favorite colors can be the perfect inspiration for your new color palette for the whole room.
Find Paint Color Inspiration
Magazines and catalogs have always been the staple of decorating inspiration. You have access to thousands of pages of inspiration on the internet. Retailer sites can be inspiring with their room vignettes, and paint company sites can also show you ways to use color in your home. Social media sites such as Pinterest and Instagram offer color inspiration that is refreshed in real-time. Pinterest is great for creating inspiration boards for your favorite ideas, so you can keep all your ideas in one spot.
Use Color Theory to Create a Color Scheme
You don’t have to study color theory to get great ideas from a little color wheel. These inexpensive color tools can generate color scheme ideas quickly. With a turn of the wheel, you can see how colors might relate to each other and learn the basics of color theory. While you probably won’t be painting your home in the exact colors you see on the wheel, you can choose shades of those colors at your favorite paint store.
Get Creative With Neutral Paint Colors
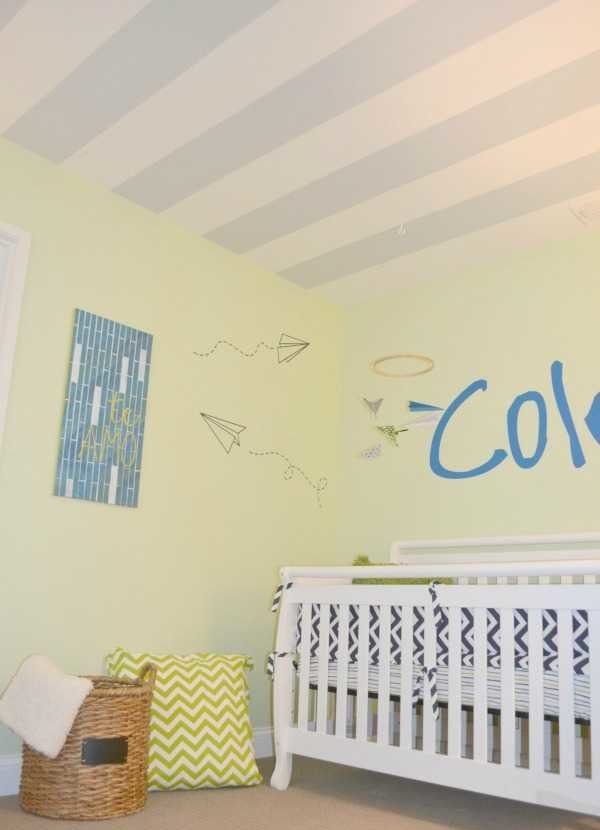
Just because you choose neutral paint colors doesn’t mean they have to be laid-back. You can rev up your neutral color palette by being creative with how the colors are used. A striped wall in neutral colors adds tons of style but still keeps the room looking relaxed. Neutral wall color with a pastel ceiling is a sneaky way to add color without losing the soothing vibe of the space.
Pull Your Paint Color From a Print
One of the easiest ways to choose interior paint colors is to start with a print fabric. Throw pillows, bedding, and even table linens can provide you with paint color ideas. If you’re creating an accent wall, look to the boldest colors in the print. If you would like to choose a paint color that is more subtle or for a larger space, look at the color in the small details of your print fabric. Take a fabric swatch to the paint store so you can choose paint strips to view at home.
How To Select the Right Paint and Color For Your Home
Painting is a quick and cheap way to give an old room a breath of fresh air or to make your house more sellable if you are putting it on the market. Find out all you have ever wanted to know about selecting paint.
Which paint should you choose?
Paint comes in a variety of sheens as well as in either oil or latex. Latex paint is the most commonly and preferred paint type to use because of its ease of clean up and long lasting durability. It also tends to be more fade resistant and breathes better than oil, resulting in less blistering of the paint. I recommend using a latex paint for most of your walls and household uses. However, oil based paint is great for priming real wood moldings and trim as it tends to seal stains and knots from the wood better than a latex paint wood. It does take longer to dry than a latex paint though, so plan for more drying time. I personally use an oil based shellac primer on my trim and then opt for a latex paint as the top coat. There are a variety of brands on the market, but my top preference is Behr paint.
Which sheen should I select?
The glossier the paint, the easier it is to clean up. If you have small children and the room you are painting has high traffic, like in a playroom, or tends to get grease on the wall such as in a kitchen, opt for high gloss sheen as you can easily wipe the wall down with a damp sponge. This will however make blemishes and imperfections in your wall more apparent and in rooms such as living rooms, could give off an unpleasant shine. High gloss is also great for trim and will give the trim a nice finished look, complementing the flatter sheen of your walls.
Which color should I choose?
If you are in the process of selling your house, I recommend selecting a white or off-white color as the choice for walls. This will allow the buyer to easily cover the wall with their choice of color and will give your rooms a brighter and clean appearance. However, you should take full advantage of the hundreds of paint selections and brochures at your local paint store as well as talk to a salesperson about the various color schemes for the look you want. You can change the feel of any room in your house with a little planning and some color, varying the shades for a certain look or feel.
I want a subtle and soothing look:
You can choose to stay within the same shade and use a monochromatic approach such as select a variety of shades of blue for subtle color that tends to be soothing. This tends to look good in a bathroom or a bedroom if you want the feeling of calmness. Just choose your favorite color and overlap the shades. For example, select a darker color for the wall and then another in the same color scheme but different shade and slightly lighter for the trim. Your curtains, towels or bedding as well as accessories such as candles can be varying shades within the same scheme. You can also layer the colors by selecting a lighter green as the basecoat and then do a faux paint with a darker green overlay.
TIPS FOR CHOOSING THE RIGHT PAINT COLOR
Today I’m continuing my quest to making choosing the right paint color easier for all of you. Last week we talked about neutral paint colors and how to choose the right one, but you will probably still end up with a few different colors or shades that you need to decide between and that is where today’s post will help you
Don’t Pick Your Paint Color First.
I know it seems natural to get the biggest things done first, but it is much easier to choose a paint color that goes with your furniture and decor than it is to choose decor to go with a paint color.
Start With An Inspiration.
Pinterest is a great place to start when deciding on paint colors. Make a board for each room and start pinning rooms that catch your eye. Once you have about 10 you’ll get a feel for what you are drawn to color and style wise.
Stick With Neutrals.
Now I’m not saying avoid color all together. Color is good, but you have to first decide where you want the attention in a room to go. If your answer is the walls, then heck, go bold. And if you go bold on the walls everything else in the room should be pretty neutral so that you don’t end up with too many things competing. This is why bold color in a bathroom can work so well because most everything else in a bathroom is already neutral (white).
Use Testers.
Buy testers in a few colors/ shades and paint a large enough area on a few different walls so that you can see how the light hits it at different times of the day. Try your best not to test your paint against white walls cause it will throw the color off. If you have to, just do a larger test area to get a better feel.

How to Choose Interior Paint Colors
Choosing the right interior paint colors depends on the kind of room you want. Take some time to think about what kind of ambiance you want. Certain colors add weight to the room while others create a lighter tone. You can also mix colors into different shades and tints to help create more visual unity. Plan out your rooms before painting so that you can make your home’s interior pleasant no matter what colors you use.
Paint with warm colors to create comfortable, energizing rooms. Warm colors include red, orange, and yellow. The brightest tints of these colors are bold and vibrant but can be too strong when used often. More muted shades can make a room feel cozier, similar to a summer or autumn day. Warm colors work well in rooms that feature a lot of activity, such as living rooms
Choose cool colors to make a room relaxing. Blue, green, and purple are all cool colors. Cool colors can freshen up a room or help you calm down after a long day. They make for good choices in bedrooms and sitting rooms. Lighter shades can feel more vibrant, while darker shades can feel more soothing
Select neutral colors to balance out other colors. At first glance, the various shades of white and gray seem boring. In decorating, they are very useful because they fit well in any color palette. They tone down warm or light colors, but they also lighten cool or dark colors. Black, brown, and light blue are a few alternative colors that can serve as a neutral base
Opt for lighter tints in order to open up rooms. Pale yellows, blues, and whites are great choices to lighten up a room. Light colors lack visual weight, which means your eye isn’t drawn to them. When you step into the room, your eye may go to a piece of art or another bright feature. Since you aren’t focused on the exterior surfaces, rooms with light colors often feel larger than they are
Here’s How to Pick the Perfect Paint Color Every Time
Let’s face it: Picking the right paint color is important. There’s no denying the shade we pick to adorn the walls is a fundamental part of any interior design project. In fact, it’s often the element the rest of our aesthetic choices are based on.
That said, choosing the ideal shade is far from easy. There are so many options available and each one just a little different than the last. For many, it’s almost impossible to figure out where to start.
Buy textiles first
Usually when we talk about textiles, they’re considered a finishing aspect of the design, so this advice may seem counterintuitive. However, one of the easiest ways to make sure your paint coordinates well with the rest of the room is to use fabrics as your design inspiration.
Work with neighboring spaces
Odds are, you’ve experienced a house where the paint choices were truly overwhelming. As you walked from room to room it may have felt as though there was nowhere for your eyes to rest, as though the home was too busy for its own good.
Factor in lighting
Like it or not, the way in which a room is lit can have a huge impact on how the room looks. Each light temperature pulls out a color undertone, which is why rooms often feel vastly different at night than they do during the day.
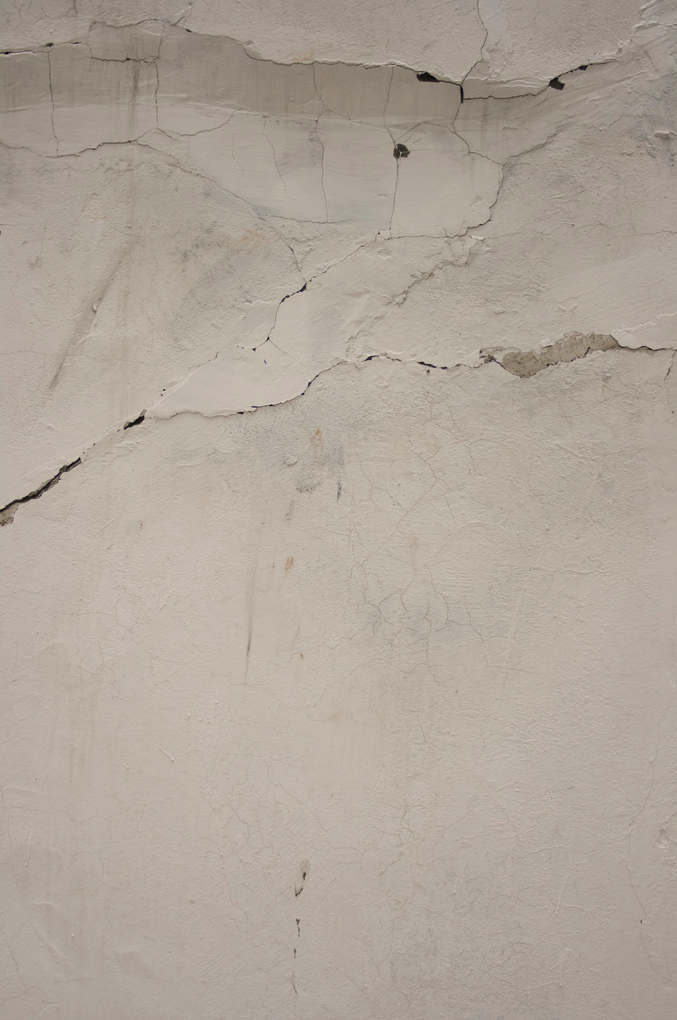
Helpful Information About Stucco Repairs
How Stucco Repair Is Done
Stucco can endure for 100 years or more, but that doesn’t mean it is impervious. Cracks and holes that develop in the surface let in water that can quickly lead to further damage to the stucco and the underlying surfaces. Patches of stucco can also break free from the wood or metal lath is it adhered to, resulting in loose areas that can grow over time. In this way, small holes often turn into bigger ones, along with more moisture exposure and damage.
Remove the Loose Stucco
Remove all loose or otherwise damaged stucco in the repair area by tapping it with a hammer and a cold chisel. Break away the loose pieces until you reach solidly adhered stucco along the entire perimeter of the area. Be careful not to damage the underlying wood lath or sheathing. If there is metal lath under the stucco, cut it out along the perimeter, using metal snips. Remove all nails or screws securing the lath, and remove the lath from the wall.
Add Building Paper
Cut two pieces of grade D building paper to fit the patch area. Each piece should cover all exposed wood materials to create an effective moisture barrier.
Staple the first piece of paper to the wood lath or plywood sheathing, as applicable. Staple the second piece of paper over the first.
Install Metal Lath
Cut a piece of galvanized metal mesh stucco lath, using metal snips. As with the building paper, the lath should match the repair area so there are no gaps between the lath and the edges of the original (well-adhered) stucco.
Position the lath over the building paper and fasten it with galvanized roofing nails. The nails must be long enough to penetrate 1 inch into the wood framing members behind the original lath or, if the wall has plywood sheathing, nails should penetrate the full depth of the sheathing.
Mix the First Batch of Stucco
Mix a batch of quick-setting repair stucco, following the manufacturer’s directions, using a drill and mixing paddle or, for large quantities, a mortar mixer.
Keep the mixed stucco in a shaded area, and be ready to apply it as soon as it is mixed. Quick-setting stucco typically has a working time of 45 minutes or less, so mix only as much as you can apply in that time.
Apply the Scratch Coat
Spray the edges of stucco around the patch area with water (to prevent premature drying of the new stucco). Scoop a fist-size amount of wet stucco onto a trowel, then sling the stucco onto the metal lath to embed the wet mix into the openings in the mesh. The stucco should be able to hold onto the mesh by itself.
Repeat the process to cover the entire patch area, then smooth the stucco into a flat, even layer that is within 1/2 inch of the original stucco surface. Carefully press and smooth the wet stucco along the edges of the patch to bond the new stucco with the old.
Scarify the scratch coat with a trowel or scarifier, then let the coat cure as directed the mix manufacturer. You may need to water-cure the stucco by spraying it with water periodically. Curing may take only one to two hours, depending on the conditions and the stucco product.
Apply the Brown Coat
Mix a batch of stucco for the second, or brown, coat. Trowel the stucco onto the patch surface in a smooth, even layer that is recessed 1/8 inch from the surrounding original stucco. Let the brown coat cure as directed, misting with water, as applicable.
Apply the Final Coat
Mix a batch of stucco for the final, or color, coat. This coat can be a standard or custom-order color to achieve the desired look. However, it is very difficult to color-match a patch so that is blends with the surrounding stucco; hiding a patch completely often requires painting or coating the entire wall with a compatible paint or pigmented coating.
Apply the final coat with a trowel so it is flush with the surrounding area. Texture the coat, if desired, to match the original finish. Let the stucco cure as directed.
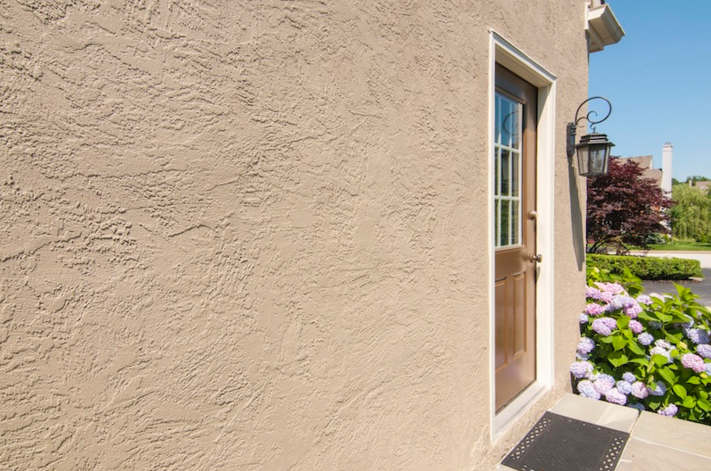
Common Problems with Stucco Homes
You’ve probably seen or heard of house hunting TV shows. The real estate agent and potential homebuyers evaluate the home’s location, bed and bath count and interior color choices. But the home’s siding rarely gets airtime. As a contractor, this concerns me, because siding is one of the key elements that determines curb appeal, not to mention its function of protecting the home from nature’s elements. Stucco siding requires careful consideration. Here’s what you need to know!
Stucco installation
As is the case with any home improvement material, stucco’s reliability depends heavily on how it was installed. Unfortunately, because stucco is comprised of several layers, there are several opportunities for an inexperienced contractor to incorrectly apply the material. One of the most common installation errors is incorrect flashing. Water intrusion, which can cause expensive damage, is a consequence of this.
If stucco sand becomes mixed with soil around the home, cracking can occur. While cracking can be repaired, the homeowner is most often the party responsible for bearing the burden of the cost. Even more troublesome is the fact that many installation issues don’t appear until several years down the road.
Water damage
In order to maintain its integrity, stucco must be kept moisture-free. It’s vital that gutters and downspouts are installed in a manner that directs water away from the home. Special care must be taken to ensure that doors and windows are tightly sealed so that water can’t permeate the stucco.
Paint color commitment
Opting for stucco on your home requires forward thinking, as this siding material can last more than 50 years. In order to update the color, the stucco must first be sandblasted. Skipping this step can create future issues with moisture.
Tips for Painting Stucco
To avoid different shades of color on your home, stucco walls should all be painted at the same time. Don’t be tempted to just paint the areas that need it. Use this time to closely inspect all the walls to identify problems (cracks, mold, pests) before they get worse.
Before painting stucco, always begin with a dirt-free surface by power washing the walls. Scrubbing the lower 1/3 of the wall with detergent and a stiff brush will remove excess dirt. Stucco paint can be rolled or sprayed on. While spraying is faster, it doesn’t always result in the fullest coverage. Brushing is not recommended.
If spraying, back rolling is a professional technique for ensuring complete coverage: Immediately after spraying a wall, have someone follow behind and roll the fresh paint with a lambs’ wool paint roller. This pushes the paint into cracks and crevices the sprayer cannot reach.
Always apply two coats of paint.
THERMAL BREAK
The new stucco systems include an additional insulation layer of Styrofoam, a feature I love because it provides more of a thermal barrier. This is known as an exterior insulation and finish system (EIFS). An acrylic-polymer coat of stucco is applied onto a base of mesh and foam board insulation. EIFS has higher plasticity, which means it has more resistance to cracking, but it is more vulnerable to high impacts such as hail or hockey pucks, than traditional stucco siding.
For my money, new synthetic stucco – if used with a high-strength backer mesh and high-compression foam – is the way to go.
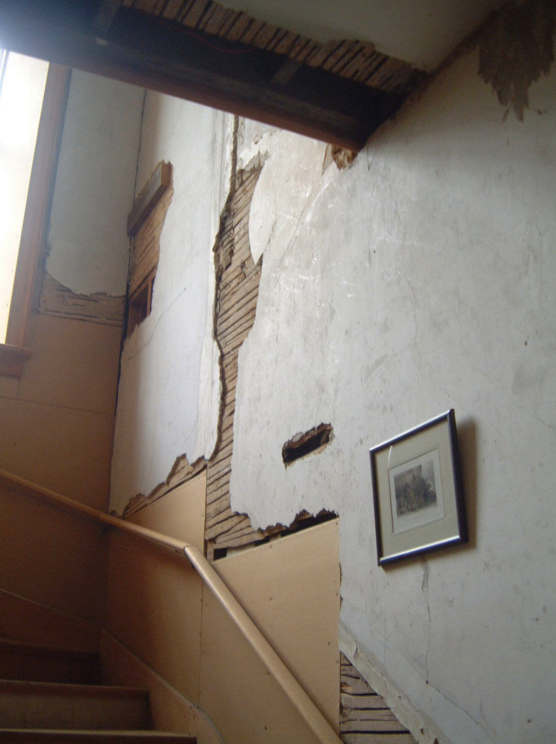
Repairing Stucco Saves You Money
If you already have plaster or stucco on your walls, removing it entirely can actually be more costly than simply calling in the professionals for repair. Even after you take off the surface layer, you’re then faced with the cost of installing an entirely new interior surface. If your home already has plaster or stucco, quality care and upkeep are investments that just make sense.
There are clearly plenty of reasons to have and keep up plaster and stucco walls, but repairing old or damaged surfaces takes the touch of a skilled craftsman. So what can you do? Call in the pros, of course. Homeowners can avoid messes and mistakes by having an experienced professional handle their repair. They can assess the current state of your walls to answer questions like:
- How well is your plaster or stucco attached to its lath (meaning the wooden slats that attach it to the wall’s framework)?
- Is it salvageable at all?
- How is the surface quality?
They will then decide exactly what the best technique is to reattach your layer of stucco or plaster to the lath, repair surface damage, and repaint it to get the exact look you want.