Does Your Drywall Need Repair? And What Can A House Painter Do About It?
When you pause to examine your drywall with a fresh perspective, you may begin to notice it the way a visitor would. Cracks, holes, scrapes, roughness, uneven surfaces, peeling tape, dented corners… they may seem like small details, but taken together, they can have a huge impact on the overall look and feel of your house.
To help you get a feel for what to look for, we have provided a description of several common drywall problems. However, it’s not very helpful to point out problems without giving helpful solutions, so we have provided those as well!
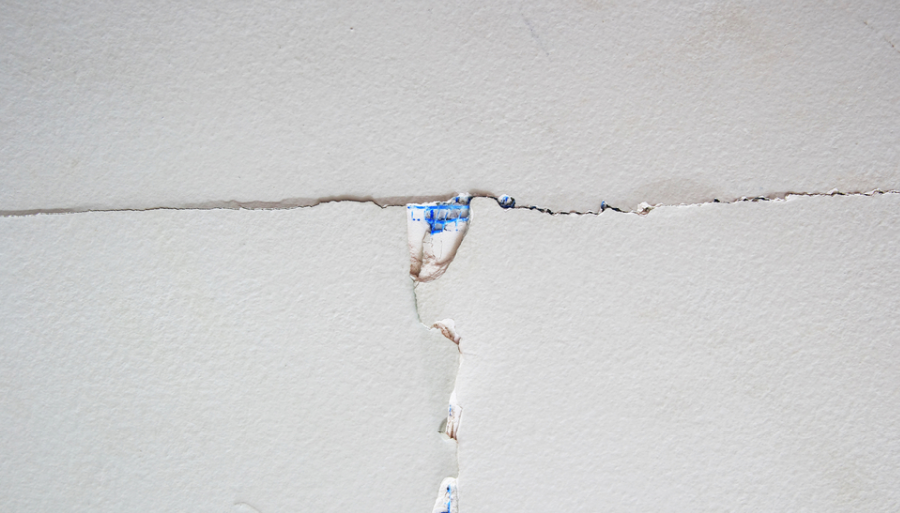
DRYWALL CRACKS
The Problem: Long, tiny cracks appear on the ceiling or walls, gradually growing longer (and possibly wider) over time.
The Cause: The drywall is fastened to wooden studs, which expand and contract with temperature and humidity. They can also bend over time. Since the drywall is not flexible, it will crack as this happens.
MECHANICAL DAMAGE
The Problem: Holes, dents, gouges, scrapes, indents and abrasions mar the surface of the drywall.
The Cause: Life, kids, pets, moving furniture, and a host of possible “oops” moments!
The Solution: Smaller drywall imperfections can be filled with drywall compound or spackle. Bigger holes need to be filled using a patch kit or a custom-cut piece of drywall to fill the hole. For best results, have a professional do the bigger patching jobs, since it is very difficult to achieve a clean, smooth repair.
UNEVEN SURFACES
The Problem: Random areas of bumpy texture on the walls, or other flaws that mar the smoothness of the surface.
The Cause: Poor installation of the drywall or a poor previous paint job. This could be caused by someone painting a wall while it was dirty, or using an old or dirty paint roller cover. Maybe a previous owner did some DIY drywall repair that didn’t produce a smooth, attractive result, and now the problem lies under a layer (or more) of paint.
The Solution: Sometimes the irregularities on a surface can be removed by careful sanding and filling to create a smooth surface. However, in some cases, the best way forward is skimcoating. This process involves troweling on a thin layer of drywall compound on a whole wall, creating a brand-new surface that is clean, clear, smooth, and beautiful!
PEELING DRYWALL TAPE
The Problem: The tape that covers the seams between sheets of drywall is coming loose, leaving visible cracks, and maybe even peeling right off the wall.
The Cause: Poor installation can cause this to happen, or water leakage, or extreme shifting/settling of the home.
The Solution: Use a razor knife to cut out the section of loose tape, sand the area smooth, and apply a new piece of drywall tape to the affected area with drywall compound. Prime the area and paint the wall or ceiling.
NAIL POPS
The Problem: Small bulges appear in the drywall, often forming cracks around them. In extreme cases, a nail head pushes right through the surface of the drywall.
The Cause: Seasonal shifting causes drywall movement, as mentioned above, and this in turn can cause nails to work their way back out of the wood, bulging through the drywall.
The Solution: Use a drywall screw to tighten the drywall back against the wooden studs, an inch or two below or above the popped nail. Then pull out the nail, or pound it firmly back in until it is below the level of the drywall. Now use drywall patching compound to fill the holes. Sand the compound smooth, prime, and paint.
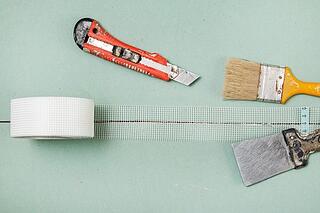
Cut out wall cracks
When homes settle, drywall cracks sometimes shoot out above or below windows and above doors. You can’t just cover or fill the cracks with joint compound—they’ll come back. Instead, fix the cracks with joint compound and mesh tape. Mesh tape gives you less buildup than paper tape and is plenty strong. Protect the window or door trim with masking tape before starting the fix.
Fill holes three times
Fill small holes and indents (less than 1/8 in.) with spackling compound. For larger holes, use joint compound instead. Apply either compound with a putty knife, spreading it thin on the wall. You’ll apply two more coats (the compounds shrink as they dry), so don’t worry if the hole isn’t filled perfectly the first time. Let each coat of compound dry (read the directions; some dry in just two hours). Don’t believe spackling labels that say you don’t have to sand—you do. You’ll have to sand between coats if there’s any excess compound. After the final coat, use fine-grit sandpaper.

Water damage
In case of extensive water damage, the best solution is to replace the entire dry wall sheet. If the structure of the wall hasn’t been compromised, you can look into dry wall repair techniques. Before attempting to repair dry wall, finding and fixing the source of the damage is important to prevent problem recurrence. Once the necessary repairs have been made, allow the dry wall to dry completely and assess its condition. If there are any water stains, use a good-quality stain blocker to prevent stains from bleeding through the finish paint. To repair superficially damaged dry wall, scrape off the loose layers of paint and topping compound, treat the areas affected by mold with anti-mold solution and let the wall dry properly. Then, apply a quality filler over the repair area, let it dry completely and sand down any bumps with fine-grit sandpaper. If the water-damaged area is soft and spongy, it will most likely need to be replaced.
How to Repair Drywall Cracks
As a home or building settles, imperfections may develop in the drywall. With this easy guide, learn the latest techniques to repair drywall cracks. The only materials you will need to repair drywall cracks and even small holes are drywall (joint) compound, mesh tape, a putty knife, sandpaper and a sharp utility knife (drywall screws are optional).
To repair drywall cracks, without hiring a local drywall contractor, follow these fast, simple steps: follow these fast, simple steps:
Step 1
Use the utility knife to remove any loose drywall material.
Step 2
Carefully create a small indentation so that once applied, the mesh tape will be flush with the surrounding drywall. To do this, cut a narrow groove on either side of the crack with a sharp utility knife.
Step 3
A crack generally occurs because the drywall is moving and may need additional support. To be sure your drywall crack repair is permanent, secure the drywall. Insert drywall screws on both sides of the crack and along the entire crack. Be sure to screw into the wood behind the drywall. Countersink the head slightly but do not break through the paper layer.
Step 4
Using mesh tape designed for drywall repair, cover the crack and heads of the screws. Note: Some experts recommend hot mud (also called “quick set” or “fast set” joint compound) instead of drywall compound when using mesh tape. The powder is mixed with water and dries very quickly — 5-90 minutes, depending on the product. It actually dries too fast for the liking of some do-it-yourselfers, who prefer ready-mixed joint compound to repair drywall cracks and holes.
Step 5
Apply a thin layer of drywall compound and allow it to dry. Repeat until the drywall compound is slightly more raised than the wall. Once the drywall compound is dry, sand the area to make it flush with the existing wall. Brush away any dust or residue.
Step 6
Coat with primer. After the primer has dried, apply paint to match the existing wall color.
Drywall tape may occasionally loosen due to the passage of time, roof leaks roof or excess moisture in the building. Repair loose tape over joints in the same manner that you repair drywall cracks. The only difference is that any loose tape needs to be carefully cut away with a sharp utility knife.
Popped Nails In Combination With Other Issues Signal A Bigger Problem.
Normal house settling can cause framing lumber to move a bit, resulting in popped nails. If the house continues to settle, over time, additional nail pops could appear. Foundation problems can also cause movement that leads to nail pops, but in both cases, they will be accompanied by additional problems, including:
- Doors that stick or won’t shut properly.
- Cracks in the drywall around windows and doors.
- Cracks in the corners of the ceiling.
- Visible cracks in the foundation.